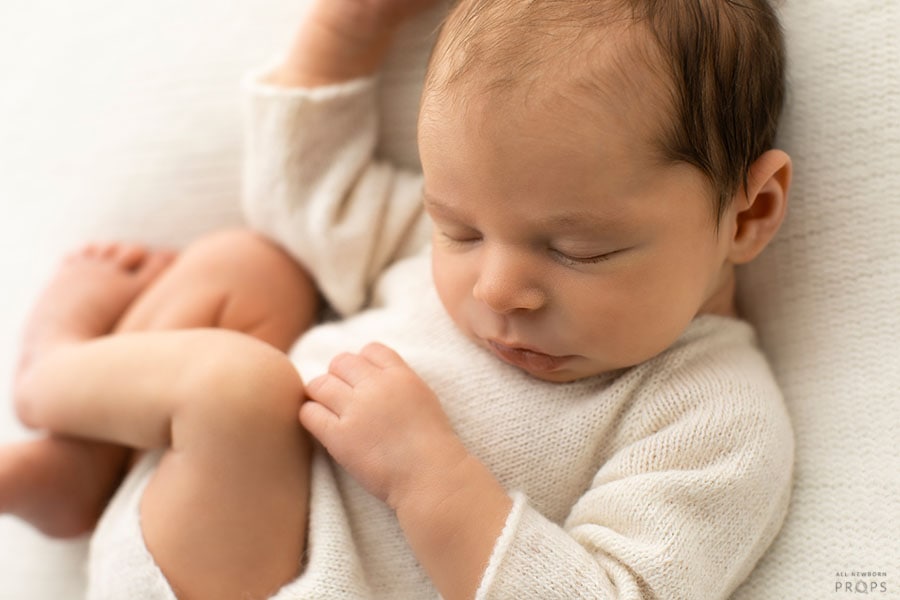
How to pose a newborn for photography in a way that feels both natural and professional? Photographers ask this question a lot. A beautifully curled pose begins with the right tools — and the right technique.
We designed the Create‑a‑Nest™ 2.0 poser to help photographers pose newborns safely, comfortably, and with less fuss. In this guide, you’ll learn how to use each part of the system to get the most flattering, secure results.
Table of Contents
- Create-a-Nest™ 2.0: A Poser Designed for Newborn Photography
- Step-by-Step: How to Pose a Newborn for Photography
- How to Position the Baby on the Poser for a Naturally Curled Pose
- Why Our Poser Works Beautifully for Newborn Photograhy
- Newborn Posing Inspiration Using the Create‑a‑Nest™ 2.0
- Styled Bundles to Build Your Dream Setup with Ease
- Posing with Confidence
- Create with the Poser Photographers Trust
- Frequently Asked Questions

Create-a-Nest™ 2.0: A Poser Designed for Newborn Photography
Thoughtfully refined to support more consistent, confident posing.
Our poser includes three parts, each carefully crafted to support beautiful posing — now with subtle updates based on real feedback from professional photographers.

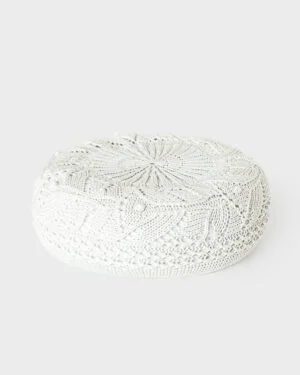
- Posing Pillow (Ring)
The heart of the poser. Its shape and structure create a gentle nest around the baby. In version 2.0, we’ve added two tufted placement points — sewn-through areas that guide where to place the baby’s bottom. These slightly lowered points help keep the hips nestled while the head stays softly elevated — essential for that naturally curled pose. - Bean
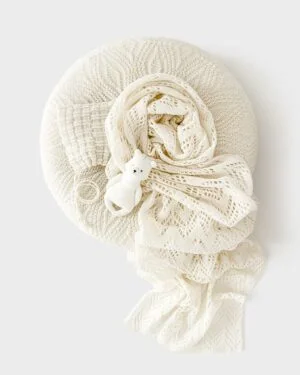
A soft, supportive insert designed to fine-tune positioning. It lifts the baby’s chest slightly, allowing the chin to rest beautifully and preventing the head from tipping too far forward or back. The Bean can be used or removed depending on baby’s size and flexibility. Thanks to the open-bottom cover, it can also be adjusted while the baby is already posed — no need to lift or reposition. - Cover (of your choice)
The final touch. Not only does it add a clean, stylish finish, but it also holds the shape and function of the poser during your session.
Thanks to the removable design, it’s easy to take off and wash between sessions — keeping everything fresh and camera-ready with minimal effort.
And because the ring size has remained the same, all Create-a-Nest™ covers — old and new — are fully compatible. You can switch between different styles effortlessly using the same base, perfect for building variety into your sessions without needing extra gear.
TIP: Once the cover is on, the tufted placement points aren’t visible. To keep track of where to position the baby, mark the spot with a small prop — like a hat, headband, or even your shusher.
Step-by-Step: How to Pose a Newborn for Photography
Once you understand how to pose a newborn for photography, everything else flows more naturally.
1. Build Your Base
Set the poser on a flat surface, layering with your chosen backdrop or styling fabrics. You can also place it in a bowl, basket, or crate.
2. Identify the Bottom Placement
The ring includes two tufted points — these create a gentle dip in the structure and mark the ideal spot for the baby’s bottom. Once the cover is on, these tufts won’t be visible, so it helps to place a small prop (like a hat, headband, or teddy) as a visual marker before covering.
3. Place the Cover
Pull the cover gently over the top of the ring. The elastic edge will hug the shape securely, creating a smooth, wrinkle-free surface that’s ideal for photographing.
Note: The underside of the poser remains intentionally uncovered. This is part of the design — it allows you to access the inner structure during your session, especially when adjusting the Bean without lifting the baby.
4. Add the Bean (If Needed)
If the baby is on the smaller side or you notice the shoulders sinking, slide the Bean under the chest area. The open-bottom design of the cover lets you do this while the baby is already posed — no lifting necessary. This small support helps elevate the chest and refine head positioning.
5. Place the Baby
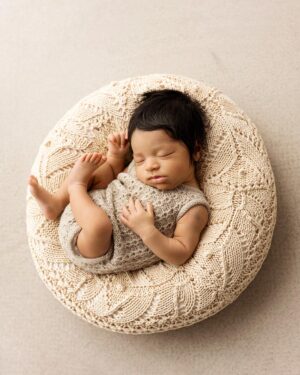
Gently position the baby so their bottom is directly above the tufted points. This ensures the hips are slightly lower than the chest and head, creating a natural, curled pose. The biggest mistake is placing the baby too deep in the centre — this causes the head to fall and the body to appear off-balance.
6. Refine the Pose
Tuck little hands, angle the head, and adjust the wrap as needed. Your goal is a soft, supported curl — not forced positioning. Always follow the baby’s natural flexibility and comfort.
7. Capture from Flattering Angles
Shoot from slightly above or the side to highlight the natural curve, facial features, and overall shape of the pose. Subtle angles help create soft, timeless portraits.

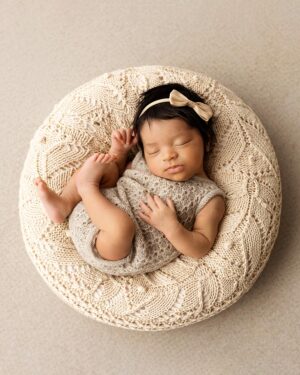
How to Position the Baby on the Poser for a Naturally Curled Pose
When learning how to pose a newborn for photography, even experienced photographers sometimes overlook one small — but crucial — detail: placement.
Let’s walk through the most common positioning mistake and how to easily correct it using your Create-a-Nest™ 2.0 poser.
Common Mistake — Baby’s Bottom Placed in the Centre
At first glance, this pose looks soft and peaceful — and it is. But here’s the hidden issue: the baby is not centered on the poser. The bottom is placed directly in the middle of the ring. It causes the body to shift upward and the head to drop slightly.
This may not seem like a big deal, but it often results in:
- The baby’s head leaning too far back or appearing unsupported
- The body lacking that deep, tucked curl many photographers aim for
- More effort during editing to create balance in the frame
In short, placing the baby’s bottom in the centre of the poser (where the hole is deepest) leads to a pose that feels off — even if it looks good at first glance.

This happens when the baby is placed too far from the structural tufted points — the two sewn-through areas on the ring. These aren’t just markers — they create a lower area designed specifically for the baby’s bottom. Missing that zone often results in a pose that feels off-balance and less naturally curled.
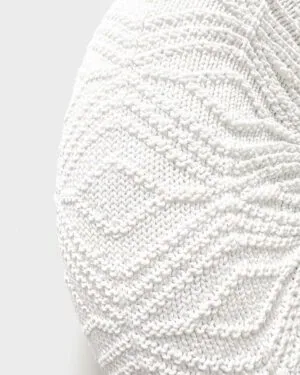
Under the Cover — Understanding the Tufted Points
With the cover removed, you can clearly see the two tufted points in the poser’s ring. These sewn-through spots gently dip down, shaping the ring to create a natural seating area for the baby’s bottom.

In this image, the baby’s hips are positioned behind the tufts, dropping too far into the centre. This causes the head to lean back and makes it harder to achieve that beautifully curled look.
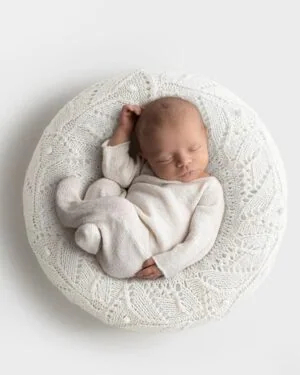
Correct Position — Bottom Over the Tufts
Here, the baby has been repositioned so the bottom sits directly over the tufted points. This is the ideal placement — the ring dips just enough to nestle the hips comfortably, while supporting the upper body for a beautifully rounded pose.

You can already see how balanced and curled the body appears even before the cover is added.
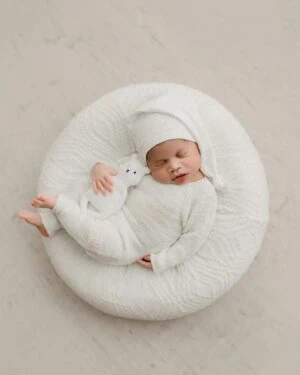
Beautifully Balanced With Cover
With the cover in place, the difference is clear. The baby is now perfectly aligned: the bottom nestled over the tufts, the head gently elevated, and the whole body softly curled in a natural, professional-looking pose.

This small shift in placement makes a big difference — and your poser is designed to make that shift easy and repeatable.
Final Tweaking — Adjusting the Bean
Once the baby is comfortably placed on the poser and properly aligned over the tufted points, there’s one final adjustment that can perfect the pose — adding the Bean.
Sometimes, especially with smaller babies, the shoulders or chest may sink a bit too deep into the ring’s curve. This can flatten the pose or cause the head to fall too low.
That’s where the Bean comes in.

Thanks to the way the cover is constructed — with an open underside and elastic edge that grips the ring securely — you can easily slide the Bean underneath the cover without lifting the baby. This lets you fine-tune the chest support in the final step of posing.
Pro tip: Adjusting support beans while the baby is already posed is a common and recommended technique among professional newborn photographers. The Create-a-Nest™ 2.0 makes this step easy and seamless.
Mastering newborn posing starts with understanding how to support the baby’s natural curl and safety.
Why Our Poser Works Beautifully for Newborn Photograhy
Photographing newborns is equal parts art and technique — and the right poser is what makes the magic happen smoothly.

The Create-a-Nest™ 2.0 was thoughtfully designed to remove the guesswork from posing a new born baby. This posing tool gives you consistent results while keeping your sessions calm, efficient, and beautiful. Every detail — from the shape to the structure — supports the pose, not just the baby.
Here’s why it works so well:
- Firm, yet flexible structure.
The ring holds its shape session after session, giving you a solid posing base without being rigid. It softly hugs the baby without collapsing or needing to be reshaped. - Built-in posing guidance.
The two tufted points gently mark where to place the baby’s bottom — creating a natural dip to support the hips while the head stays slightly elevated for that signature curled pose. - Removable Bean insert.
The separate Bean can be added under the chest (even after the baby is placed) to fine-tune shoulder and chin support — no lifting, no stress. - Stretchy, wrinkle-free cover.
The cover hugs the ring perfectly with a soft elastic edge, preventing any folds or shifting that could disrupt your setup or require editing later. - Perfect size for newborns.
Designed specifically for the newborn body — there’s no need for rolled-up towels, makeshift fills, or time-consuming adjustments. - Washable and interchangeable.
The cover is easy to remove and clean between sessions, and you can switch between styles using the same base — ideal for photographers who value consistency and creativity.
In short: it’s not just a pillow — it’s a new born baby posing system for photoshoot.

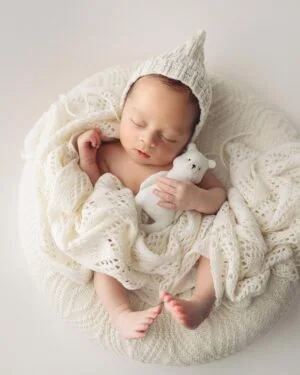
Newborn Posing Inspiration Using the Create‑a‑Nest™ 2.0
One of the things photographers love most about the Create-a-Nest™ 2.0? It’s how effortlessly this posing tool fits into a wide range of setups. Whether your style is minimal and organic or rich and layered, this poser adapts to your vision — while supporting the baby beautifully in every pose.

Here are just a few ways you can style it in your next session:
- Tucked in a vintage bowl or basket
Add layers of texture underneath — wool curls, lace, soft knits — and let the poser elevate the baby naturally from within the prop. - Placed directly on a flokati rug
For an airy, natural look. Keep the styling minimal with just a wrap or bow and let the baby be the focus. - Layered with tone-on-tone wraps and bonnets
Match the cover with one of our coordinated wraps, rompers, or accessories for a soft, monochromatic setup that’s cohesive and timeless. - Built into a full storytelling setup
Use the poser as the base, then build around it with florals, seasonal elements, or textured fabrics that reflect your client’s style.
No matter the setup, the Create-a-Nest™ 2.0 keeps your posing flow smooth — so you spend less time adjusting and more time creating.
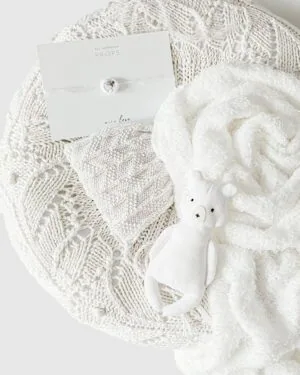
Styled Bundles to Build Your Dream Setup with Ease
We know how much time goes into planning a newborn session — especially when it comes to styling. That’s why we’ve created coordinated bundles designed to match or complement your Create-a-Nest™ 2.0 poser.
Each bundle includes a poser, wrap or romper, and accessory — carefully selected to help you create cohesive, gallery-ready setups with ease.
These coordinated sets make styling easier — and give you everything you need to practice how to pose a newborn for photography with confidence.
We marked all bundles are with a “Bundle & Save” badge and offer at least 10% off compared to purchasing items individually. The discount is automatically applied, so you don’t have to think about it — just style, shoot, and enjoy the results.
Whether you’re photographing a full session or just want one go-to setup that works every time, these bundles take the stress out of prep.
-
Newborn Photography Prop Bundle – Pure Pearl
From €9.99Exclusive Line
-
Newborn Photography Prop Bundle – Ivory Thread
From €30.00


Posing with Confidence
Posing a newborn isn’t just about placing the baby somewhere soft. It’s about creating a space that supports their natural shape, keeps them comfortable, and helps you photograph them with ease and intention.
With the Create-a-Nest™ 2.0, correct placement becomes second nature. From the structural tufted points to the removable Bean and stretch-fit cover, each part is designed to make your sessions smoother and your images stronger.
Whether you’re just learning how to pose a newborn for photography or refining your workflow as an experienced photographer, this poser is here to support you — literally and creatively.
Create with the Poser Photographers Trust
Designed to support perfect placement and consistent results, the Create-a-Nest™ 2.0 helps you pose with confidence and ease — every session, every baby.
-
Create-a-Nest™ Newborn Poser – Perry (Pearl)
Price range: €140.00 through €215.00Exclusive Line
-
Create-a-Nest™ Newborn Poser – Perry (Ranch Tan)
Price range: €140.00 through €215.00Exclusive Line
-
Create-a-Nest™ Newborn Poser – Gordon (Ivory)
Price range: €120.00 through €195.00

Frequently Asked Questions
If you still have questions about how to pose a newborn for photography or how to use the Create-a-Nest™ system, you’ll find the answers here — from posing basics to version compatibility.
Posing Basics
The poser includes two tufted points that mark the ideal spot for the baby’s bottom. These create a subtle dip in the ring, helping you position the baby naturally for better curl and head support.
The Bean insert is optional and can be placed under the baby’s chest — even after posing — to gently lift the shoulders or chin. It’s especially useful for smaller babies or when fine-tuning the pose mid-session.
Yes — the cover is open underneath, so you can slide the Bean into place while the baby is posed, just like you would on a beanbag. It’s a safe and professional way to refine your setup without disturbing the baby.
Setup & Styling
Yes! The Create-a-Nest™ 2.0 fits beautifully inside most round or shallow props. It adds structure and elevation while keeping the baby comfortable and safe.
Absolutely. The cover is removable and washable, so you can keep your setup fresh between sessions. Simply remove, wash gently, and let air dry.
Yes — the cover is interchangeable, and you can build a small collection of covers to match different styling setups. All are designed to stretch snugly over the ring for a smooth, wrinkle-free finish.
About the Poser
Unlike many posing pillows that require rolled towels or constant reshaping, our newborn poser has a structured yet flexible ring, built-in tufted placement points, and an optional Bean insert to support natural, curled posing during photography session without extra props. It’s designed for consistent, professional results — right out of the box.
Compatibility & Upgrades
Unlike many posing pillows that require rolled towels or constant reshaping, our poser has a structured yet flexible ring, built-in tufted placement points, and an optional Bean insert to support natural, curled posing without extra props. We designed this new born baby poser for consistent, professional results — right out of the box.
Yes — the ring structure has stayed the same in size and shape, so all Create-a-Nest™ covers are fully compatible across both versions. Whether you own the first version or are upgrading to the new 2.0 system, your covers will fit perfectly.
The 2.0 version introduces subtle structural updates — including built-in tufted placement points — to support even better posing and positioning. So your previous props still work beautifully, while the new version offers refinements made with your feedback in mind.
If you already own the original Create-a-Nest™ poser, you’re still working with a beautifully shaped, session-tested tool — and your covers will continue to fit the new version seamlessly.
That said, the 2.0 update includes subtle refinements based on real photographer feedback — especially the addition of tufted placement points that make it easier to position the baby correctly from the start. If you find yourself adjusting poses often or want a little more built-in guidance during setup, upgrading the base might be a welcome improvement to your workflow.
Save This Guide for Later on Pinterest
This guide is packed with practical tips for how to pose a newborn for photography — from setup to final refinements.
Pin it now so it’s always there when you need it for your next session.