There’s a quiet kind of magic in a neutral cream newborn setup — where everything feels calm, light, and intentional. The baby settles more easily, each detail belongs, and you can move through the session without rush or doubt. Cream tones invite purity and focus, letting the story centre on the newborn — not the styling.
This article is written for professional newborn photographers who want faster sessions, cohesive galleries, and predictable editing without stop‑start re‑posing cycles. The approach is baby‑led: keep the palette disciplined, layer texture under the outfit, and use a planned angle map so variety comes from composition and light — not from moving the baby every five minutes.
What you’ll achieve
- A cohesive gallery: 13 images built from two variations that read as one body of work.
- Speed without stress: a 10‑minute base setup that scales up via angle changes.
- Cleaner edits: neutral creams reduce colour cast and make skin work predictable.
- Client‑ready layouts: sequences that slot neatly into albums and framed picture sets.
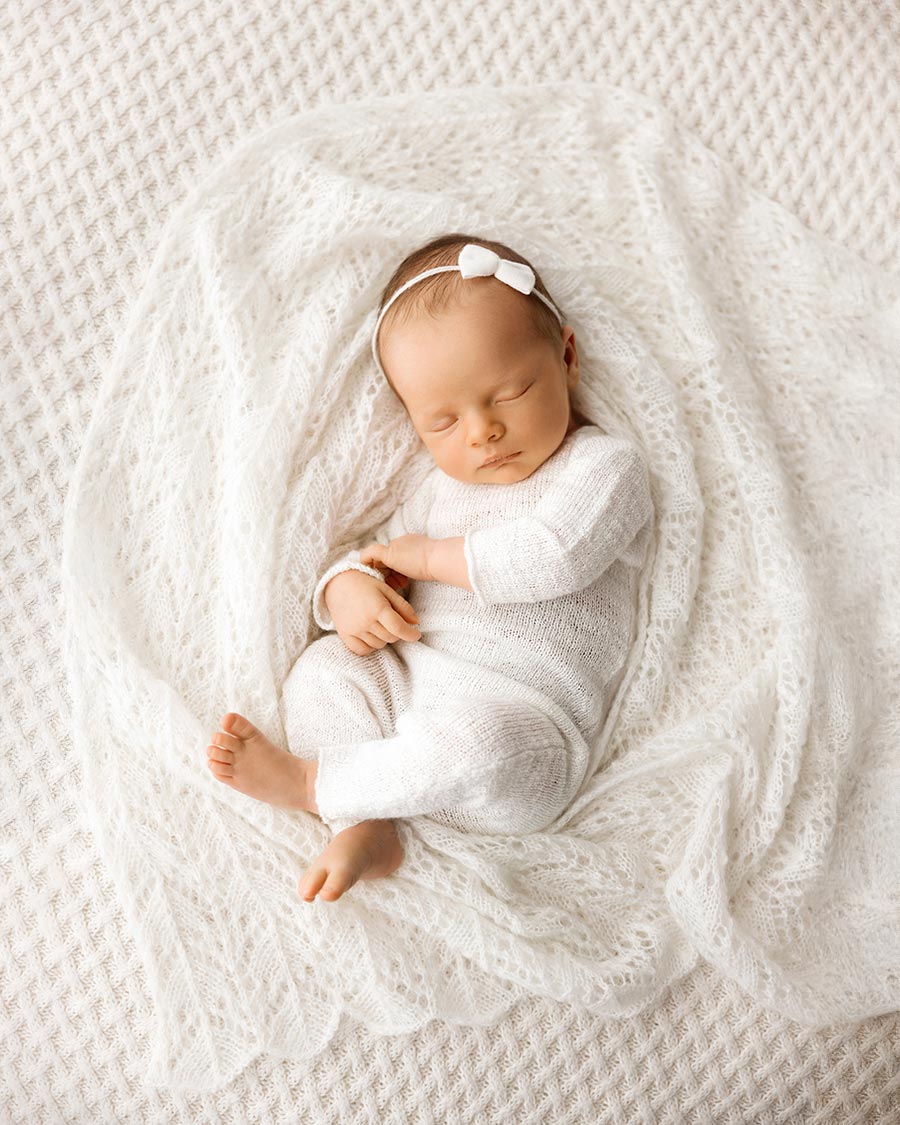
Table of Contents
- Gear & Prep for Photographers
- The 10‑minute Neutral Cream Newborn Setup — Baby‑Led Edition
- Setup 1 — Signature Cream: Pointelle + Plain‑Knit
- Create the Cream Setup Photographers Love
- Wake‑Switch Method — Full Change, Same Palette
- Setup 2 — Alternate Cream Variation: Full Switch, Same Palette
- Create the Second Neutral Cream Newborn Setup
- Angle Plan: Variety Without Re‑Posing
- Troubleshooting — Fast Fixes Pros Actually Use
- Editing Notes — Consistency Over Heroics
- Album & Framed‑Picture Planning — Client‑Facing
- Studio Pitfalls to Avoid
- FAQs for Photographers
- Studio Standards We Build Into Every Piece
- The Art of Cohesion
Gear & Prep for Photographers
Before every session, preparation determines how smoothly the next hour will unfold. The goal is not just efficiency, but comfort, safety, and clean, consistent results.
White Balance & Lighting
Start with a neutral white balance between 5400–5800 K.
Set a custom value for your specific lights rather than relying on auto-WB. Neutral creams will photograph cleanly when your lighting temperature stays consistent across the sequence.
Lens & Aperture Plan
Keep two primes ready — 50 mm / 60 mm / 85 mm are the most flattering for newborn proportions.
Shoot around f/2 – f/2.8 to hold texture while keeping backgrounds softly separated.
Comfort & Safety Notes
Maintain a room temperature of 24–26 °C.
Warm your hands before touching the baby and minimise clothing changes. Stability and calm transitions always come before styling adjustments.
Backdrop & Colour Family Tips
Stay within one cream family — warm or cool — throughout wraps, outfits, and bases.
Mixing tones creates unnecessary skin‑tone correction in post and breaks gallery cohesion.
The 10‑minute Neutral Cream Newborn Setup — Baby‑Led Edition
A calm, baby‑led workflow lets you capture a full gallery without multiple posing cycles. The secret is palette discipline, layered texture, and intentional use of angles. This neutral cream newborn setup is designed for baby‑led sessions that flow naturally, keeping your angles and palette consistent.
Palette Discipline
Choose one to two cream tones that flatter newborn skin.
Cohesion in tone allows micro‑variations in light to tell the story instead of colour shifts.
Wrap as a Layer
Use the wrap under the outfit to introduce depth and texture without bulk.
This keeps the silhouette refined and the fabric free of distracting folds.
Baby‑Led Posing Logic
Let the baby’s natural micro‑movements create variation.
Adjust angles and crop distances rather than the pose itself — fewer interruptions mean smoother sessions.
Angle‑Based Variety
Rotate your shooting position: top‑down, side/backlit, and close crop.
Changing your perspective provides a full gallery while the baby stays settled.
Wake‑Switch Overview
When the baby naturally wakes for feeding or a change, use that moment to refresh the entire set — wrap, base, outfit, and accent — while keeping the same palette.
You’ll restart with an alert, comfortable baby and a fresh variation that still belongs to the same visual story.
New to baby-led posing? Start with our simple newborn posing guide.
Setup 1 — Signature Cream: Pointelle + Plain‑Knit
This setup forms the foundation of the neutral‑cream look. It blends refined texture with a clean silhouette, designed for efficiency, timelessness, and cohesive editing. This look is the heart of a neutral cream newborn setup, combining refined texture with simplicity for timeless results.
Why This Neutral Cream Newborn Setup Works
The pointelle wrap adds a subtle, refined texture that reads softly under light, while the plain‑knit sleepsuit keeps lines smooth and uncluttered.
The contrast between pattern and simplicity gives depth without distraction — perfect for editorial, neutral galleries.

Tip: Position the wrap slightly under the chest so texture defines the body line without touching the face.
Angle Plan — Sample Sequence
- Top‑Down: Outfit detail, relaxed hands, clean negative space.
- Close Crop: Lashes and skin texture — keep the focus soft.
- Side/Backlit: Introduce depth; feather the light to avoid hotspots.
- Profile: Gentle head turn, balanced chin‑to‑chest spacing.


Key Takeaway
The most cohesive galleries come from discipline, not quantity: one palette, two textures, four angles — endless refinement.

Create the Cream Setup Photographers Love
Build the calm, cohesive look featured in this article with the complete Whispered Cream Newborn Photography Prop Bundle.
Designed for smooth session flow and effortless styling, this curated set includes the matching wrap, outfit, and headband — crafted to photograph perfectly together and keep your workflow seamless.


Prefer to Curate Your Own Setup?
Each prop from the Whispered Cream Bundle is available separately, giving you the freedom to mix textures or layer tones while maintaining the same timeless palette.
Choose the pieces that fit your style — the wrap for subtle texture, the outfit for perfect fit, or the headband for the finishing touch.
-
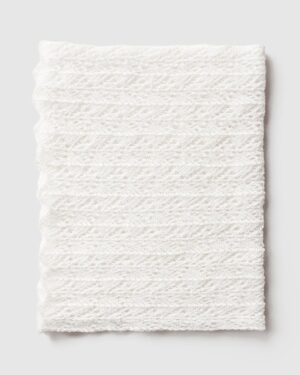
Pointelle Knit Wrap – Newborn Photography Prop Wade (Cream)
Price range: €60.00 through €110.00Signature Collection


Wake‑Switch Method — Full Change, Same Palette
Every newborn session has natural breaks — use them strategically instead of seeing them as interruptions.
The wake‑switch transforms your setup and gallery variety without disturbing the baby’s rhythm.
When to Switch
As soon as the baby wakes for a feed or nappy change.
It’s the perfect reset moment: you’re already adjusting comfort, so refreshing props feels effortless.
Why It Improves Flow
You maintain continuity — the same cream palette ties both looks together — while introducing a fresh base, outfit, and accent.
Parents see visual variety, yet your editing workflow stays unified.
Implementation Tips
- Prepare both setups before the session starts.
- Keep each full set (base, wrap, outfit, headband) in its own bag.
- Replace everything in one go; avoid mixing pieces from different sets.
- Re‑check white balance after the switch to ensure consistency across both setups.
Result: You double your deliverable images while keeping the entire gallery cohesive and editing‑friendly.
Setup 2 — Alternate Cream Variation: Full Switch, Same Palette
After the wake‑switch, the second setup keeps the same tonal harmony while offering a new silhouette and mood. This variation feels fresh to clients yet remains consistent in your final gallery.
Why This Neutral Cream Newborn Setup Works
Changing the posing base and outfit reshapes the baby’s form and light interaction, giving subtle contrast to Setup 1.
Cream consistency ensures every image still belongs to one visual story — elegant, calm, and cohesive.

Angle Plan — Sample Sequence
- Top‑Down: Symmetry and outfit detail; maintain relaxed hands.
- Close Crop: Highlight texture and expression; eyelashes crisp.
- Side/Backlit: Define shape and dimension; avoid clutter behind the subject.
- Profile: Tiny rotation only; preserve chin‑to‑chest spacing and shoulder line.


Key Takeaway
Two complete setups within the same palette create effortless variety. What changes is shape and light, not colour — your session stays calm, your gallery looks editorial.

Create the Second Neutral Cream Newborn Setup
Recreate the second look featured in this session — a continuation of the same calm cream palette with gentle textural shifts and a new silhouette.
Each piece below complements the first setup seamlessly, giving you variety without changing the overall mood.
The original headband has been retired; the Delilah Headband below offers the perfect subtle replacement.
-
Newborn Styling Pillow – Loki
Price range: €70.00 through €90.00 -
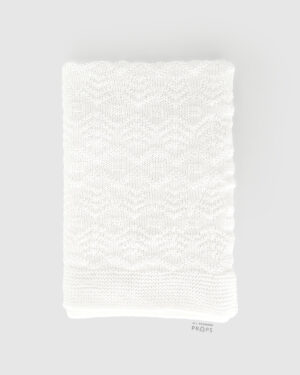
Wrap for Newborn Photos – Conner (Off-White)
Price range: €40.00 through €60.00 -
Newborn Tiebacks – Delilah
€13.00


Angle Plan: Variety Without Re‑Posing
Angles are your silent styling tool — they provide diversity without disturbing the baby. Plan them in advance to keep your workflow predictable.
Top‑Down
Use for establishing shots and texture emphasis.
Watch the balance of negative space and keep your camera directly overhead to avoid perspective distortion.
Close Crop
Focus on lashes, lips, or fabric detail.
Keep textures subtle near the face; the goal is intimacy, not clutter.
Side/Backlit
Add dimension by letting light graze across the wrap or outfit.
Feather your modifier to maintain soft edges and consistent background tones.
Profile
A small head turn changes the entire narrative.
Keep the shoulder line consistent between setups to preserve continuity across spreads.
Tip: Rotate your own body around the poser rather than adjusting the baby.
Small shifts in light and lens position will yield a complete, varied gallery without re‑posing.
Troubleshooting — Fast Fixes Pros Actually Use
Even the most cohesive setups can misbehave under light or time pressure. These quick corrections save your gallery when small variables throw things off.
Lighting & Exposure Issues
- Skin looks waxy in creams: lower fill power, reduce diffusion slightly, and flag the key light to pull specularity off the forehead.
- Flat top‑down results: raise your shooting height or add a minor angle to your key light for shadow definition.
- Background spill: add negative fill or lift the subject off the backdrop to avoid unwanted cast.
Texture & Fabric Placement
- Texture overpowers the face: move strong weaves under the torso, not near cheeks.
- Uneven fabric tension: stretch evenly around the poser rim; adjust corners before fine‑tuning the baby’s pose.
- Folds catching highlights: feather your light sideways; matte fabrics help reduce bright edges.
Colour Harmony in Creams
- Mixed tones fighting each other: choose either warm or cool cream and keep every element in that family.
- Slight mismatch in post: warm the cooler shot by +100–200 K rather than desaturating the warm one.
- Off-white base reading grey: increase exposure slightly; most “muddy” creams are under‑lit, not wrongly tinted.
Composition & Depth Fixes
- Image feels flat: add negative space and depth by separating baby and background by 3–5 cm.
- Distracting background: use a narrower aperture or bring your light closer for faster fall‑off.
- Framing too tight: shoot one step wider — you can crop later, but you can’t recompose missed negative space.
Takeaway: fast fixes rely on light, distance, and consistency, not new presets.
Editing Notes — Consistency Over Heroics
Editing should enhance what you planned, not repair what wasn’t. Keep adjustments minimal and repeatable.
White Balance Workflow
- Set the neutral cream first, then refine skin tones.
- Avoid per‑image tweaks; batch‑sync WB and tint across the whole sequence for editorial cohesion.
Texture & Clarity Adjustments
- Apply local clarity or texture only on fabrics, never on skin.
- Keep global sharpening low — newborn skin prefers softness; let the wrap carry detail instead.
Highlight & Contrast Unification
- Match highlights on the forehead and nose tip across all frames; viewers subconsciously read this as consistency.
- Pull midtones slightly higher on side/backlit shots to avoid split exposure tone.
Export Logic
- Deliver a balanced set: top‑down, close, side/backlit, and profile.
- Maintain similar exposure and white balance across both setups so they flow naturally in albums or online galleries.
- Use subtle vignettes only if they support focus; avoid heavy gradients that break the calm, airy tone.
Takeaway: less retouching equals faster delivery and a stronger portfolio signature.
Album & Framed‑Picture Planning — Client‑Facing
Every session should end with tangible storytelling. Designing with albums and wall sets in mind helps you shoot intentionally and sell confidently.
Suggested Album Spreads
- Spread 1 — Setup 1: Hero top‑down image plus two supporting close crops for detail balance.
- Spread 2 — Setup 2: Side/backlit hero paired with profile and a texture detail.
Maintain tonal balance between pages — neutral creams allow seamless sequencing without jarring transitions.
Wall Display Ideas
- Linear trio: three consistent angles (top‑down → profile → side/backlit) for horizontal framing.
- Asymmetric cluster: one framed picture plus two supporting prints.
- Square trio: equal framing ratios for a calm, editorial feel.
Cream tones make it easy for clients to visualise a finished wall display that feels refined and timeless.
Cohesion & Sales Psychology
Consistent colour and texture communicate quality — even to non‑photographers.
When every frame belongs together, clients perceive the set as one story rather than individual images, increasing the likelihood of album upgrades and multi‑print purchases.
Takeaway: plan your gallery like a designer; cohesive layouts sell themselves.
Studio Pitfalls to Avoid
Avoiding small missteps keeps editing time low and your reputation high.
Colour Mixing Mistakes
Never mix warm and cool creams within one session — it creates skin‑tone drift and extra editing.
Commit to a single family before the shoot.
Over‑Texturing Near the Face
Heavy textures draw attention away from expression.
Keep strong weaves under the torso and softer knits near the face.
Lens & Distortion Issues
Avoid shooting too close with wide lenses; this elongates features.
Step back slightly and re‑frame with 50 – 85 mm primes for natural proportions.
Workflow Disruptions
Don’t chase new colours mid‑session or swap too many props.
Stability keeps the baby relaxed and your creative flow uninterrupted.
Takeaway: discipline in palette, texture, and workflow is what separates professional results from constant correction.
FAQs for Photographers
Base + layer + outfit + accent: prepare 1 posing base, 1 wrap as a layer, 1 outfit, 1 minimal headband for Setup 1. Have a complete second set (pillow, wrap, outfit, headband) ready for the wake‑switch.
Backup logic: keep one spare wrap and one spare headband in the same cream family to handle spills or unexpected marks.
Pointelle under outfit: gives refined texture without bulk.
Subtle weave near torso: keep stronger textures away from the face so skin stays the hero.
Start swaddled: this helps the baby settle.
Unwrap once sleeping: slowly reveal hands or feet and shoot through the transitions to add variety without re‑posing.
Wake‑switch moment: after a feed/change. Replace base, wrap, outfit, headband in one go but keep the same cream palette. You get a fresh look that still reads as one cohesive gallery.
Larger pillow for shape: a big, stable posing pillow (e.g., Loki) changes silhouette and height.
Safety first: stability over height; build lift with subtle padding rather than steep angles.
Minimal bow, matching cream: keep scale small, textures matte, and avoid high‑shine elements near the forehead.
Consistency rule: if you use a bow in Setup 1, choose a similarly minimal option in Setup 2.
One family only: pick warm or cool cream and stick to it across base, wrap, outfit and headband. Mixing families leads to extra skin‑tone correction.
Two primes, ready: e.g., 60–85 mm for top‑down/profile, 50–60 mm for close crops.
Aperture plan: f/2–f/2.8 maintains texture with separation; avoid ultra‑wide close‑ups that can distort features.
Lock white balance first: set a Kelvin target, then match shot‑to‑shot.
Local texture control: add detail on the layer/outfit, not on skin.
Highlight discipline: keep forehead/nose highlights consistent to unify the sequence.
Studio Standards We Build Into Every Piece
Our design philosophy is simple — create newborn photography props that look refined, perform beautifully, and last.
Washability
Every knit is selected for shape recovery after cleaning. Easy care means reliable texture and form session after session.
Stability & Support
Materials are chosen for firmness where needed — providing a secure base without excessive padding or instability.
Palette Cohesion
Each collection is tested under neutral lighting to ensure colour consistency across wraps, outfits, and bases.
This keeps your editing predictable and your galleries harmonious.
Our Design Philosophy
We craft each piece in small batches, prioritising timeless design, comfort, and dependable function — so your workflow stays calm and your images stay classic.
Takeaway: timeless design and thoughtful construction allow you to focus on artistry, not adjustments.
The Art of Cohesion
A cohesive gallery isn’t about collecting props — it’s about creating harmony through light, texture, and thoughtful design. Every All Newborn Props piece is made to support that balance: stable where you need it, soft where it matters, timeless in every frame. When your tools work seamlessly, your sessions flow effortlessly — and your art becomes the calm your clients remember.
A neutral cream newborn setup captures more than a colour story — it reflects calm craftsmanship and the trust you bring to every session.
Posing flow and images by Kristina Mack from Tiny Posers.